This article was originally published June 25th 2008
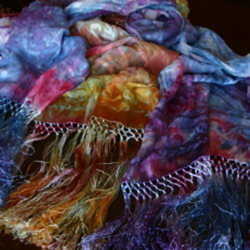
Hand-dyed silk scarves like these can cost $50 or more in a fancy boutique. The look is exotic, and the process looks like it has to be difficult, but with a few purchased materials, a beautiful gift can be created with simply leaves and a few colors.
These sun sensitive paints can be used on any fabric, but silk is luxurious, and most people feel much cherished when receiving the gift of silk. The silk blanks can be purchased from several places. The ones I am using cost less than $5 each, and came from Dharma Trading. I have used Dharma Trading for many years, and service is wonderful. Pro-Chemical is another company that I have personally patronized, and am quite pleased with their service. This is in no way an advertisement for either company; I have just used both with great results. You can purchase your dyes and cloth wherever you feel comfortable. Michael's Hobby Stores carries a selection of Pebeo products also. The set of 10 colors that is shown here cost about $45. They will do an enormous amount of sun prints. Colors can be purchased individually also. There are several brands of sun printing paints that can be used on fabric, but I have always had lovely results from the Pebeo brand. They are a French company and are marketed around the world. All of these companies have websites, and are quite happy to accept orders on line. The Pebeo company will offer a list of vendors that carry their products, along with some wonderful ideas for using their products.
 Materials needed
Silk scarf blanks (synthetic materials are ok too)
Pebeo Soliel or Setasilk fabric paints
Cups to mix colors
Foam brush,
pins or tacks,
spray bottle with water
Plastic covered workstation
Leaves from your garden or trees
 Choose a sunny day with as little wind as possible. I usually do sun printing in the early morning before the day heats up and the sun gets too hot. The heat will dry the colors quickly before they get a chance to blend, and the wind will blow the leaves right off of your silk.
For this particular project, I covered a piece of cardboard with plastic because there was enough wind that the scarves needed to be pinned to it. On a windless day, one can simply lay the plastic on the ground.
 Unfold the scarves and remove the "Made in China" tags. Place the hemmed side down on the workstation and insert a few straight pins to secure it. Do not worry about the wrinkles; they will go away when the water is sprayed on it. The scarf on the upper portion of the picture has been sprayed. The lower scarf has not.
 For this project, I used some ferns and some leaves off various hardwood trees. The ferns are perfect for a cool-hued woodland themed scarf, and the leaves will be turned into an autumn colored scarf. The plant material needs to be fairly young and fresh to do a good job, as they should be pliable enough to make good contact with the fabric. If you wait until fall to do a leaf print, the leaves will be too thick and brittle to use. It is even desirable if the leaves are a bit wilted.
Assemble the materials, and choose the colors you will be working with. Spray the pinned scarf with the water and manipulate it around a bit to remove the wrinkles. The water needs to make the scarf damp, but not soaked and flooded. The colors need to run a bit and blend, but too much water will fade and wash out your sun prints. Make sure that your hands are clean before touching the silk. It is easy to stain with dirt or plant juice, and then you will have to use complimentary colors to cover up your boo-boo. (tomato foliage stains a lovely shade of chartreuse, by the way)
 Start working with your colors a little at a time. Remember that when two colors blend, they make yet another color. Yellow and blue make green. Yellow and red make orange. Blue and red make purple. Green and red make brown. It is best to use different colors sparingly until you are confident of the mixed results. Too many colors will just turn your creation into a muddy mess. For this project, I used yellow, green and blue for the ferns. They blended nicely and the variations
  gave the project more depth. For the autumn leaves, I used yellow, brown and coral. When you purchase any dye or fabric paints, make sure that you get a generous amount of yellow. Yellow seems to go with every combination and you will use more of it than any other color.
Start by sprinkling a bit of your chosen colors on the dampened scarf. If you are using the Setasilk, the colors can be used straight from the bottle. For the Soliel Setacolor, they need to be thinned to a watery consistency. Use two colors at first and work with the first 12" to 18" of the scarf. Dampen your foam brush a bit and start moving the color around on the fabric. Add a drop of the third color here and there for accent. In the case of the ferns, the blue was my accent color. Use the foam brush to blend the colors into a pleasing pattern, and remember this fabric is damp. It will bleed and blend a bit more as it dries. You can mix new colors in paper cups or on saucers if you wish.
 Now it is time to place your plant material on the colored part of the project. Work quickly, as the sun will set the colors. Arrange the foliage in a pleasing pattern. I have found it is best to place them face down to get the most contact with the fabric. Use your fingers to press each piece into the damp fabric and make sure that they "stick" to it well. When you have this done, continue down the scarf adding more color and more leaves as you go. You may wish to use latex gloves for this part, because you can stain your fingers easily.
When the project is complete, stand back and wait until the sun print magic works. This is usually about 15 minutes on a sunny day. You can carefully lift an edge and check if you just can't stand it anymore. Once the color had been removed, you can take the leaves off the scarf to finish drying.
When the scarf is dry, it needs to have the colors set so that your creation can be washed. Simply iron the piece with a dry iron for about 5 minutes. Silk is fragile, so use a press cloth if you are unsure about temperatures. I generally use the lower settings for wool. Just iron over the piece, making sure that the fabric becomes hot to the touch for several minutes, and then it can then be gently washed, or dry-cleaned. These are fabric "paints' not dyes, and even though they are permanent, they can be faded by harsh soaps and hard scrubbing. Treat your scarf like any other fine garment, and use care when washing it. Roll in towel to remove excess water, and hang to dry.
Any fabric can be used with these paints, and the sky is the limit on ideas and creativity. You can use any item that makes a silhouette, and you can even cut out your own shapes.
This project is simple enough for children to do with supervision, and can make some stunning gifts for teachers and grandmothers. Gardeners can find many plants that will make lovely prints. Grasses, flowers and seedpods are all good possibilities. Use your imagination and create some lovely gifts for gardening friends, or for yourself. Sun printed silk scarves are stunning and are easy to make. Go ahead and try some!