The first thing many folks question is how long it might take to fill up a rain barrel. The answer is that it’s much quicker than you think! There is an easy formula posted in a publication by the University of Florida [1] but to simplify it here, it means that if you have 1 inch of rain on a roof area of 1200 square feet, and allow for some waste and evaporation, you will have 500 gallons you could capture. Now I am NOT going to get up on my roof to measure the area, but my floor area is 1200 square feet, therefore the roof area is more. So, now I ‘get’ that if I have 50 gallon (average) capacity rain barrels at each of my 5 downspouts, I should be able to fill them all with less than ½ inch of rain.
To use that rainwater, I need my rain barrels to be higher than where I want my watering hoses to empty. The higher my barrels, the greater the pressure, or “flow”. Also, the larger my garden hose diameter, the greater the flow. I am fortunate that my house sits up higher than my garden so my barrels can be at ground level once I make a flat spot. However, I have one raised bed against the house in front that’s about 18” higher than the ground. To water that bed, I will need a barrel whose bottom is higher than the bed. One gallon of water weighs 8.33 pounds so a full barrel will weigh more than 400 pounds. I may have to stack concrete blocks instead of the wooden crate I had planned to use to support that barrel!
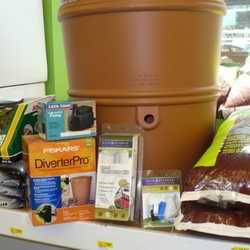
Making a rain barrel requires only a few common tools, and is so easy an unskilled person can make one in very little time. In fact, it might take longer to go to the hardware store or a big box store (like Lowe’s or Home Depot) for the parts!
Most rain barrels are made from plastic drums, usually around 55 gallons, which is a fairly standard size. Some are made from very expensive oak barrels. You could buy either type new, but plastic barrels are readily available used. The one made in this article was a beverage syrup drum, food grade. I have other plastic drums that once held fruit purée shipped to a baby food plant. Beverly’s (Sundownr) husband Scott (who made the rain barrel in these photos) also found a 55 gallon drum that held pickles. Just be sure the drum has held nothing toxic!
 |  |  |
| Cutting Plastic Drum | Hose Bibb, Nut and1"Spade Bit | Hose Bibb in Place |
The drum in these photos had only a small access hole in the top so the first step for Scott was to cut off the top of the drum, using a jig saw. (Some barrels, like my other barrels, have an entire removable top, providing access to install the fittings.) This barrel was also tapered near the top so he had to cut it such that the top still had a flange to sit just inside the body of the barrel, which meant also removing about an inch of barrel below the first cut. Next, drill a hole for the hose bibb (that’s the valve with a handle to turn the water on and off, and where your garden hose attaches). Our hose bibb needed a 1” hole drilled. Wrap the threads on the valve fitting with Teflon tape, put the threaded part through the hole, and tighten it securely from the inside with a 3/4” lock nut made for electric conduit.
 |  |  |
| Overflow Parts | Overflow Tightened Inside with Nut | Finished Overflow |
The overflow hole was drilled just down from the top lip far enough to let the lid close. He cut a 2” hole with a jig saw (but you could use a hole saw) to accommodate the overflow. The overflow assembly was a 2” PVC male adaptor and a 2” PVE street elbow. The street ‘ell’ was just pushed into the adaptor with a piece of fiberglass window screen between the 2 pieces to keep bugs out. The adaptor was secured inside the drum with a 2” electric conduit locknut. Then, because I might want to move the barrel at some point, Scott suggested a “sight gauge” to show the water level. The sight gauge was made with 2 fittings (90º PVC pressure fittings: ½” OD (outside diameter, for the tubing end with 3/8” diameter inside to hold the tubing) and a piece of 1/2” OD polyethylene tubing.You could also use clear vinyl tubing of the same size; it just costs more.
 |  |  |
| Nut for Overflow | Sight Gauge Parts | Sight Gauge Quick-Disconnect |
Wrap the threads of each fitting, insert into a 5/8” drilled hole, and screw the fitting in. It will form a secure fit to be water-tight. If it should leak, you can go back and add a 3/8” lock nut to the inside threads. Insert the tubing into the fitting. Add a float button inside the tubing, cut the tubing to length, and insert the tubing into the top fitting. (NOTE: the sight gauge top should be located ABOVE the bottom of the overflow valve, and the bottom of the sight gauge positioned BELOW the bottom of the hose bibb or the float button will escape into the barrel.) If you need to remove the tubing for any reason, simply pull the inside quick-release part slightly out of the fitting to release the hold on the tubing. Beverly and Scott tried several materials looking for something to float inside the sight gauge. What worked best was a small “button” cut from a scrap of the barrel material. Beverly painted them black or red with a permanent magic marker.
 |  |  |
| Screwing in the Bottom Sight Gauge Fitting | Attaching Sight Gauge Tubing | Sight Gauge in Place |
All that was left to do was adapt the top to accept a downspout. Since the rain coming off a roof contains dust, bird droppings and who knows what other debris, it is important to screen the hole for the rainwater to enter (and keep mosquitoes from laying eggs in the water). Scott cut a rectangular opening just larger than a downspout, and made a 2-part screen: one layer of fiberglass window screen, and one layer of the wire mesh used for plaster work to give the screen some strength. All 4 corners of the debris screen were bolted through the top, using a flat washer on either side to prevent tears. Although we didn’t do it on this barrel, when I install mine I plan to also run a bead of silicone sealant at the junction of the screen and the barrel material. That is to keep small particles (like the granules from my roofing shingles) from getting trapped between the barrel lid and the screen.
 |  |  |
| Cutting Opening for Water Intake | Fastening Intake Screens | Aligning Barrel to Mark Downspout for Cutting |
Before installing the barrels for their house, Scott made a level platform from concrete cap blocks. Then, he set the barrel on top and held the downspout adaptor in place to determine where to cut the downspout. Moved the barrel, cut the downspout with a hacksaw (or aviation snips), inserted the downspout adaptor, attached it with sheet metal screws or pop rivets, and moved the barrel back into position. (Note: Allow enough space when cutting the downspout and adding the "ell" so the barrel lid can be removed for any necessary cleaning. This also reduces splashing against the dwelling.)
 |  |  |
| Support Blocks | Finished Support Base | Finished Rain Barrel |
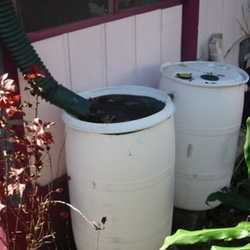
OKAY, WE'RE READY, BRING ON THE RAIN!
Here’s a handy link:
U.S. Drought Monitor To see the drought status in your area, click on your state.
Material Costs:
$ 0.72 (1/2" OD polyethylene tubing 18¢ per foot, need 3-4 feet)
$ 5.56 (1/2" OD x 3/8" ID plastic MIP $2.78 each, need 2)
$ 7.73 (3/4" hose bib qtr turn $7.73 each, need 1)
$ 1.07 (2" PVC male adapter 104-1 $1.07 each, need 1)
$ 1.42 (2" PVC 90 street elbow 30 $1.42 each, need 1)
$ 7.00 (Used food grade plastic 55 gallon drum)
$ 23.50 total (plus misc. screen, teflon tape, small bolts, washers and nuts; sheet metal screws or pop rivets for downspout)
Satisfaction: Priceless!
Tools Needed:
Jig saw
Hand drill (portable or corded)
5/8” and 1” spade bits
2” spade bit or hole saw for overflow fitting
(or trace around the fitting and use a jig saw to cut the hole)
Slip Joint pliers
Screwdriver
Hacksaw (or Aviation Snips) to cut the downspout
Pop Rivet gun (optional) and misc. drill bits
Footnotes:
[1] “Cisterns To Collect Non-Potable Water For Domestic Use”
Document AE64, Florida Cooperative Extension Service, Institute of Food and Agricultural Sciences, University of Florida. Original publication date 1987. Revised, 1993. Reviewed June 1, 2003
Photo Credits: All photos by Sundownr, Used by Permission
See also 2 previous articles on rain barrels: