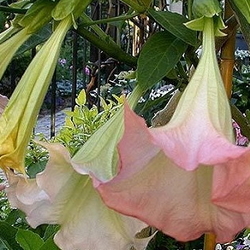
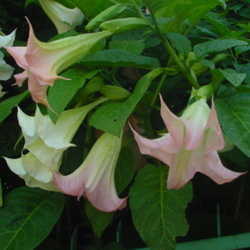
Brugmansia, Angel's Trumpet, and "brug" are all interchangeable names for this intoxicating, scented stunner from South America. Because they are so easy to grow, share, and propagate, Angel's Trumpets are a staple to modern gardeners. If you don't have one or you don't know anything about them, you are truly not far from having and beholding one of the most rewarding plants in the kingdom.
If you do know and love brugmansias, but are afraid of what will happen to your beautiful large plant in a zone that will not be kind to it, a cutting is a fantastic way to keep your plant alive through the winter. If you plan ahead and take healthy cuttings from the right spot on the plant, you should be successful at getting a healthy plant by next season.


Choosing your cutting
There is a vast assortment of beautiful brugmansias to choose from these days. Old classics like 'Dr. Seuss' and 'Frosty Pink' have paved the way for newer varieties of doubles and deeply colored Angel's Trumpets. So if it is possible to choose just one, pick which brugmansia you would like to grow. You can purchase cuttings on the DG Marketplace, eBay, or trade for a variety here on Dave's. Easy ones to get your hands on are 'Dr. Seuss', 'Charles Grimaldi', and 'Ecuador Pink'. Beware that sometimes people sell Datura as Angel's Trumpets and they are not the same! The way you can tell the difference: Daturas point up and brugmansias point or hang down.
For those of us who are variegation obsessed, be wary that variegated brugmansias are more difficult to start from cuttings as well as grow in general. If this is your first go-round with Brugs, it is advisable to start with a non-variegated, more common variety.
One thing to keep in mind is where you take a cutting from the parent plant. Curiously, it will make a diffference in what shape of plant will result and how soon it will bloom. If you are looking for blooms sooner, take a cutting above the "Y." Brugmansia growers can describe until they're blue in the face what a "Y" looks like, but it's confusing until you actually see one.
 |  |  |
A "Y" as seen from above. You can see the two distinct growth spots. | A "Y" as seen from the side. Growth will happen on the two new shoots which used to be one. | Don't confuse a "Y" with natural branching that the Brug will do |
The "Y" is a very important feature of growing brugmansias. Brugmansias will not bloom until the growth after the "Y" forms. After you grow them for a while, the first "Y" of the season will almost give you butterflies in your stomach...it means blooms are close! So if you want a cutting that will bloom sooner, you need to take a cutting above this pivotal point on the parent plant because it is believed the two are related.
Cut & Paste
It is very easy to take and successfully start a cutting of a brugmansia, as well as some more in depth techniques. Truth be told, most likely either way will be prosperous for you. You can choose to start brugmansia cuttings in water or directly in soil.
**Please take caution when dealing with and taking cuttings from brugmansias. Most people are sensitive to toxins in the sap, especially on skin and eyes. Be careful not to let sap splash in your eyes or sit on your skin for too long by taking precautionary measures such as wearing goggles and gloves. If you do get the sap in your eyes immediately flush with water for several minutes.**
If you are having a hard time deciding between the two methods (water or soil), you just need to evaluate a few things. How often you are willing to care for your new cutting? If you start in water, you will need to replace the water every few days and monitor the water quality until you pot up the cutting. Once you pot up the plant, you will also need to provide extra water while the plant adjusts to its new growing environment. If you choose to start a cutting in soil, you must monitor the moisture levels of the soil constantly until it forms roots, at which time you can slack off a little in your care. Once you decide upon your rooting method, here are the instructions:
Rooting in water
 | The Easiest way: Cut a 4- to 6-inch section of stem, making sure you have a growth node in the segment which looks like crook or bump on one side of the stem (pictured at left). Sometimes you can see a scar from a former leaf or a small green nub of leaves poking out. Each cutting does not have to have leaves so long as it has a growth node. Once you have the segment cut, immediately put it in clean tap water near a bright window. Be sure to change out the water every other day or so to keep it fresh. Do not let the leaves sit in the water. Within a week or two, you should start to see white ‘nubbies' which are the beginnings of new roots. |
Some tips for success:
- When you take your segment, make the cut with a sharp, sterilized knife at a 45 degree angle
- - Remove all but three or so leaves. Any further foliage will take energy from the root formation; each cutting does not have to have leaves
- - You can add the cutting to a bubbler or an oxygenated environment
- - An older section of stem may be easier to root. It will have a beige, woody look to it when removed from the parent plant
- - You can add rooting hormone or a vitamin supplement such as Superthrive to the water (follow dosing suggestions)
- - It is sometimes believed that sunlight can help speed up root formation; using a clear glass can aid in this process
-- - Warm water will also speed up root formation


If your water becomes murky or smelly, or the cutting is any bit mushy, you have probably lost the cutting to rot. If you can, cut the rotten section off and retry with the remaining intact section in clean water.
Rooting in soil
Rooting in soil is also very easy with brugmansias. You can either root a cutting vertically or horizontally in soil. Either way, you will need at least one growth node (as described above) per segment so that the plant has a place to form new leaves. Choose light weight, fertile potting soil to begin your cuttings in. The most important aspect of the soil is that it needs to be able to hold some moisture content as that will aid in root formation. For both vertical and horizontal rooting, you will need a medium (6 to 8 inches) pot of soil that you need to pre-wet, so that it is damp but not wet or soaking. A good rule of thumb for wet versus damp is this: damp soil should stick to your fingers while wet soil will compress and stick to itself.
- Vertical rooting: Cut a 4- to 6-inch long segment and strip the plant down to 2 to 3 leaves. After watering the soil to pre-wet it, make a hole in the potting soil with your finger. Push the cutting down about 1 to 2 inches and firmly press the soil around the cutting to support it vertically.
Over the next few days, monitor the moisture level by feeling or observing the soil. You want it to remain damp but not wet, which could rot the cutting. After 2 to 3 weeks, roots should start to form. You can test this by lightly tugging at the cutting and feeling the resistance. If in doubt, wait another week; if it is rooted, you should start to see signs of new leaf growth and if it hasn't rooted, you will likely see or smell signs of rot.
- Horizontal rooting: A good reason to root Brugs horizontally is if you don't have a long enough cutting for the vertical method, or if you want more plants per each segment. This method is a tiny bit more difficult and has a somewhat high failure rate. For horizontal rooting, you again will need at least one growth node per segment. Place the cutting lengthwise across the potting soil, burying up to ¾ of the diameter under the soil, pressing the soil firmly around it. You must monitor the moisture level because the cutting can easily rot.
Roots!
In as little as three days, you can start to signs of new roots on your brugmansia cutting. If you are using the water rooting method, you will begin to see white "root nubbies" as they are affectionately called.
 |
| Root "nubbies" |
Once you see root nubbies, real roots should come soon. Don't slack off on water changes at this point because the cutting can still rot all the way through the process. Keep an eye on the cutting and withing a week or so you should see roots emerge.
If you are using the soil rooting method, you will be less aware of the status of the cutting's root growth. The only real way to know for sure is to wait and see if new leaves grow. Healthy, larger, and deep green leaves will grow from rooted cuttings. You can also give the cutting a light tug to see if it resists. Be careful though, you could damage new roots if you try tugging at the wrong time. Your best bet is to wait and see what happens with your cutting rather than get impatient and ruin your progress.
Now what? | Once you know you have roots, there are a few things to keep in mind. If you have started your cutting in dirt, you don't have to do anything besides monitor moisture and keep the cutting in bright light. brugmansias like lots of water but not to be drowned. If you started your cutting in water, you can immediately pot into dirt or you can leave in water for several months. Once you pot a water-rooted cutting in dirt, you have to give it a transitional time of increased water to get it used to not being immersed in water. You can bury the cutting as deeply in potting soil as you see fit. Brugmansias are cousins to tomatoes, who also like to be buried deeply because they will continue root growth all along the stem. Sometimes the transition from water to soil can be difficult, so don't feel bad if you loose some of your cuttings in this process. |
Please Beware As with any other popular, commonly traded plant, brugs can fall victim to disease. When you make cuttings, share, or otherwise propagate brugmansias, please take care to label well, keep good records and use clean equipment. Most of us ‘backyard gardeners' will never fall victim to the dangers that are related to this beauty, but a little proactive care never hurt anyone.
|
|

All photos copyright to Susanne Talbert