We love annuals for their dependable waves of color. We loathe having to spend the money every spring to reap that benefit. Luckily, some annuals take very well to cutting and rooting. A minor investment of your time and indoor space may allow you to carry this year's flowers over for next spring. Here's how to take stem cuttings, root them in soil or water, and get them growing again next spring.
Choose certain annuals.
This propagation technique is not a good choice for ALL annuals. Focus on your smaller, bushy annuals that can grow in partial to full shade. We are looking for plants that can be kept through the winter as smallish potted or water-rooted plant, which will yield some stems in late winter for further cutting and rooting. References I checked cite Coleus (Solenostemon), Wax (fibrous-rooted) Begonias, Impatiens and Pelargoniums (zonal geraniums) as cooperating well with this method. In addition, Hypoestes (Polka dot Plant), Ageratum (Floss Flower), and some Plectranthus may be used as annuals and work well this way. After all, the term "annual" is a subjective designation based on a plant's lifestyle and sensitivity to cold. Feel free to experiment with your bedding or container plants, keeping the plant's light requirement and growth habit in mind. These named plants have a reputation for rooting readily, without any added rooting hormone. Giant sunflowers are not an appropriate choice for this method!
Take soft stem cuttings in late summer
Mid to late summer is the right time for stem cuttings. Plants should still be growing well, with plenty of stems. September's continued warmth and sunlight encourage the cuttings to root. For propagation next spring I'd suggest you plan to make one plant now for every three to five plants you want to produce later. Please note they are called "cuttings" because a clean cut reduces the chance of damaged, rotting stems in your pot or vase.
 |
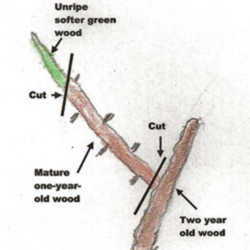
The node knows...Do you know your nodes? Nodes are those places on a plant's stem where leaves or side branches arise. These spots are also the most likely to produce roots when placed in water or soil. When you take your cuttings, make the cuts just above a node. The donor plant will make new leaves or stems at the remaining topmost node and quickly hide the small stub. Click on this link to see a larger version of this picture or those below. |
Trim up for potting
A good cutting will have at least one node below soil for new roots, and one or more above the soil for leaf growth. A cutting should not have many nodes in the dirt (that would neccessitate a windowsill-hogging larger pot, more prone to overwatering.) Well prepared cuttings also shouldn't bear too much greenery either. Lush, bushy cuttings may struggle as the plant tries to support the leaf metabolism on litttle or no root input. Any flowers or flower buds should be removed. But wait; for every rule there is an exception. If you are taking cuttings for water-rooting, you'll need enough stem to hold the cutting upright and ensure that the end of the stem stays submerged. Be sure to remove any leaf material that may end up below the water line. It will only rot and endanger the health of the whole specimen.
 Lay out your cuttings and trim accordingly. Discard excess stem below the bottom, "rooting", node. Also consider removing or trimming some of the leaf area. Leaf trimming requires a judgement call on your part. Now pot up your prepared cuttings in small pots of good quality soil. As always, keep the pot proportional to the plant. Enclosing the potted cuttings in loose plastic will help maintain humidity. I used a clear plastic bag supported by disposable chopsticks from our favorite steakhouse. (Cuttings placed in water won't need a humidity cover.)
The "explosion" at right resulted from my trimming of one stem each of Alternanthera, Begonia and Solenostemon. I removed leaves and lengths of bare stems, and trimmed some larger leaves to reduce their area.
 While warm weather continues, your new plants should thrive in a bright but shaded location. New growth on the leafy end of things, within a few weeks, is evidence that rooting is progressing on potted pieces. Don't forget to bring your new plants inside when frost threatens! Care for them as you do other houseplants. Potted annuals might need a move to a slightly larger container if they grow very well. Stems in water must be watched for rot, and the water changed often to keep it fresh.
In late winter, think spring
Now that you're a pro at making cuttings, just repeat the steps in late winter to increase your stock before spring planting. Allow a month from your last frost date for roots to form, and a month more minimum would allow your new plants to beef up before the transition to outside.
~@~ ~@~ ~@~
On the left, my cuttings are doing well after five days in soil.
This link will take you to a Garden Bookworm list of books dealing with Plant Propagation; this other link will give you a list of books about Annuals and Biennials.
I double-checked my technique by referring to Plant Propagation A to Z: Growing Plants for Free by Geoff Bryant, and The American Horticultural Society Plant Propagation: The Fully Illustrated Plant-by-Plant Manual of Practical Techniques, Alan Toogood editor-in-chief.