(Editor's Note: This article was originally published on October 12, 2009. Your comments are welcome, but please be aware that authors of previously published articles ma not be able to respond to your questions.)
So you get your bulb home, plant it in compost (sometimes provided in the box with a plant pot), burying the bulb up to the base of the neck. I sometimes soak the roots for 24 hours, taking care not to wet the base of the bulb. You can put the bulb on top of a cup or glass for this purpose. Don't water too much at first after planting until you see some signs of growth.
Some bulbs will produce flower buds first, some leaves first and with some you get both together. It doesn't really matter and won't affect flowering. This is the really exciting part about growing Hippeastrums, watching the plant develop each day. As the flower stem lengthens you can turn the pot a quarter turn each day to stop the flowers leaning towards the light. The buds will gradually open out over several days and the flowers can last for a couple of weeks.


There are fewer plants that give such an impressive display. By planting your bulbs a few weeks apart you can have months of colour in your home during the bleak winter months. In Maine my amaryllis helped me get through the snowy winters!
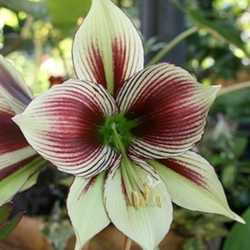
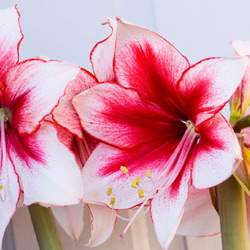
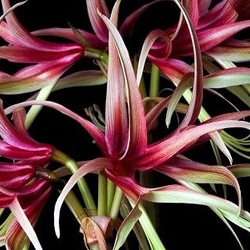
There are many varieties to choose from. The more commonly available ones include 'Apple Blossom' and 'Red Lion', and if you search them out there are miniatures including 'Fairy Tale', 'Trentino' and 'Amputo', huge doubles like 'Dancing Queen' and 'Elvas' and new cybister types such as 'Chico', 'La Paz', and 'Emerald' with long thin petals.


After your bulb has flowered, the stem will wither, and you can cut it off near the base to prevent the bulb wasting energy producing seeds. Now the plant's leaves will grow and concentrate on producing food to feed the bulb which will have noticably shrunk in size. Hippeastrums are gross feeders, and you should encourage the plant to grow its leaves through the spring and summer, giving it a good houseplant fertilizer bi-weekly. If you wish you can put your plants outside during the summer, taking care not to put them into hot sun. Or you can plant them in the ground if your climate is favourable.
At the end of summer your plant may naturally stop growing and the foliage will yellow and die off. To promote this you can dig up your plants or bring in the pots and keep them in a cool place (around 55F). The pots can be stacked up in a garage or shed on their sides or the bulbs can be taken out of the pots and laid on newspaper. A cool period of 8 to 10 weeks of dormancy is needed. You can force plants that are still growing into dormancy by cutting off the leaves within about an inch of the bulb top and storing them as above. If you aren't in a cool enough climate you can force dormancy in your bulbs by refrigerating them. Place them in the crisper section of the fridge for a minimum of 6 weeks. Remember though that apples produce a gas that will sterilise your bulbs so don't store them in your fridge near any apples.


Once the dormant period is over you can gradually bring your bulbs back into growth, staggering the blooming so that you have a succession of flowering.
Forcing dormancy this way will weaken your bulbs so I don't recommend doing it year after year.
Of course you may well wish to skip this process completely, letting your plants produce leaves as and when they will. Some will enter a dormancy period themselves, others will keep leaves growing and bloom when they have a mind to! 
Note: Plants such as H. papilio are usually evergreen and shouldn't be forced into dormancy. My own plant has recently taken a break from growing of its own accord and is now putting out new leaves.
All photos in this article are mine. Varieties pictured are 'Faro', H. papilio, 'Grandeur', 'Sumatra', 'Pink Accent', 'Vienna', 'Misty' and Elvas.