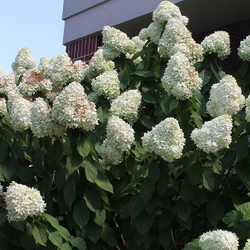
Many people in hydrangea-growing regions cut fresh blossoms and display them in earthenware pitchers or other simple containers. Brides choose the blowsy flowers for bouquets and to ornament their weddings. These showy blooms can be cut from the garden or ordered from specialty suppliers ready to be used. Used to illustrate this article were Hydrangea macrophylla and H. paniculata 'Limelight'.
Cutting and Conditioning Fresh Hydrangeas
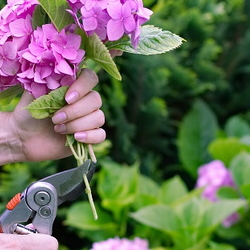
Cutting fresh hydrangeas for indoor use is most successful if a few basic steps are followed. Take a bucket of water with you when you are ready to cut a fresh bouquet. Cut the stems and immediately place them in water. Condition the hydrangeas in one of two ways to ensure a long-lasting display.
Hot Water Method
1. Boil water in a cup or other container.
2. Cut the hydrangea stems to the desired length.
3. Place the cut end in the boiling water for about half a minute.
3. Plunge the stems into room temperature water.
4. Arrange as desired.
Alum Dip Method
1. Cut hydrangea stems to the desired length.
2. Dip the bottom half-inch of the cut stem into powdered alum.
3. Place the stem in your arrangement.
If you have arranged your hydrangeas in a vase only to find them wilted a day later, you can rejuvenate them. Pour out the old water and fill the vase with fresh water. Then use the boiling water method to revive your flowers. If the blooms are not too old, they should be as good as new within an hour or so. Don't give up after an hour, though. Sometimes it takes several hours for the flowers to rehydrate.
Drying Hydrangea Blossoms

 Not only are hydrangeas beautiful when cut and displayed fresh; dried blossoms will last indefinitely! Paint them, dye them, or use them just as nature colored them. Use them in wreaths, simple bouquets, or get creative and use them in more elaborate designs. Many floral designers keep dried hydrangeas for years and use them frequently. In the Exhibition Table Type II design at the left, dried hydrangeas were painted purple and used in a creative manner.
Learning to dry hydrangeas was a hit and miss proposition for me. It took much experimentation to find the best way. I've tossed them in the car trunk for a couple of weeks, hung them upside down in a blazing hot attic, and simply put the cut stems in a vase of water and left them until the water evaporated. I had very mixed results with these methods until I learned a trick or two. The most important part of the process is waiting until the blossoms are ready before harvesting them. This factor is much more important than the method that is used to dry them.
If hydrangea blossoms are cut too soon, they wilt terribly and may never revive. The flowers must be mature if they are to last. Best results occur if the blossoms are left on the shrubs until the petals begin to age and take on a vintage look. If left on the shrub long enough, many will turn interesting shades of burgundy and pink. No additional coloring will be necessary for beautifully dried flowers. They can be cut toward the end of summer and placed immediately in boxes or vases with or without water.
Using silica gel to dry fresh blossoms is a different matter. With silica gel, blooms do not have to be completely mature and can be dried when they are at their height of color. This method is more expensive and a bit more complicated. The process will be the topic of another article.
 Coloring the Blooms
The dried flowers can be painted with soft shades of spray paint. That works well for many uses. More natural colors cay be obtained, however, by using Rit dye to color the dry flowers.
 With the dying process, blooms can be colored to produce deep shades or light shades-or a combination of both, depending on your wishes. Begin this procedure with hydrangeas that are thoroughly dry. Bring a large pot of water with your choice of dye color in it to a rolling boil. Stir to make sure that the dye is thoroughly dissolved. If you want light colors, dip the flowers in the boiling water for a short time. For deeper colors, leave them in for a longer length of time.
You may be disappointed with your first attempts to dye hydrangeas. Sometimes the older blooms are not light colored enough and the dye does not cover these dark areas. This can be remedied by spray painting the dark areas with white spray paint (any kind will work). After the paint is dry, dye the blossoms the color you like. Painting prior to the dying process prolongs the usefulness of older blooms. I found that flowers that were painted prior to being dyed turned out a lighter but more consistent color. Interestingly, bleaching with Clorox did not lighten the blooms but turned them an unattractive brown hue.
To Dye Hydrangeas:
1. Cover work surfaces with newspaper.
2. Have your dry, light-colored or white blooms right beside the boiling pot of dye.
3. Dip one cluster at a time into the boiling dye bath and hold it in for a few seconds.
4. Remove the blossom. Do not be alarmed if your blossom appears to be ruined. All is not lost; it will fluff back up.
5. Hang the blooms to dry in an airy place.
6. Store in a dry place until ready to use.
Sources of Alum
Many grocery stores stock alum in the spice section or in a section with pickling spices. Some drug stores have it in stock or can order it. I ordered mine from http://www.myspicesage.com/. One pound of alum costs $5.50, but shipping charges increased the total to $9.50. I'll have enough to share with all my hydrangea-loving floral designing friends.
 |  |  |