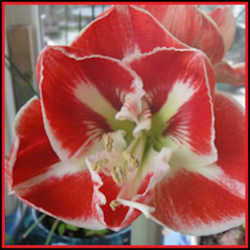
I got five Amaryllis (Hippeastrum) seeds as bonus in one of my first DG trades and dashed to PlantFiles to see what I should do with them. I read that it's best to sow the seeds when they're fresh, so I grabbed a little clay pot and planted them right away. Seeing 5 slender, grass-like leaves emerge was such fun! Then I read that it could be years before I'd see a bloom. Ah, well. I tucked the pot away at the back of my plant stand. As the seedlings grew, I separated them into bigger pots. Then, one winter, I got a bloom! (Photo at upper right is my first seed-grown bloom.) I was hooke d. I had to try again this year, starting in winter with seeds from my own plants.
Let's have a moment of blunt honesty: it can take 3 to 5 years for an amaryllis seedling to get big enough to bloom. Why would anybody bother? It's quicker to grow out offset bulbs and quicker yet to just buy a fat new bulb. There's a certain thrill in creating a new plant, in not quite knowing what you're going to get when you hybridize your own. Sometimes, it's another way to propagate a hard-to-find favorite. Self-pollinated seeds won't come true to the parent plant, but some will likely be close.
If you have two pretties blooming at the same time, cross-pollination is easy. To reduce the chance of a flower also self-pollinating, use a newly-opened bloom.  Carefully clip the anthers (the things shaped like great big grains of rice, where the pollen will emerge) from the bloom, so their pollen won't get on the stamen.
  Just toss them out, or save them to pollinate another plant. Now pick an anther with fluffy golden pollen from another plant that you want to cross with your parent bloom. You can also use a little brush or q-tip to transfer pollen from one plant to another. Dab the pollen generously onto the stamen (the female structure, a slender projection ending in a tri-lobed stub).
If the ones you want to cross don't cooperate by blooming at the same time, don't worry. You can save pollen in the refrigerator for a few days or in the freezer almost indefinitely. I found some little plastic containers at the dollar store that are perfect for holding a few pollen-laden anthers, freshly snipped from a bloom. 
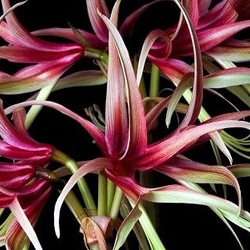
Often, seed pods will form without any help from you. Most likely, they are self-pollinated. You can deliberately make a self-pollinated cross, of course, by dabbing the flower's stamen with pollen from the same bloom. Why would you want to cross a bloom with itself? Re-mixing the combination of genes that produced a hybrid can give you completely new results, hopefully with some of the same desirable charactistics of the parent. One of my favorite amaryllises this winter was a mis-labeled variety that we've been unable to ID. I'm hoping its self-pollinated offspring will have the same light fragrance (unusual for an amaryllis) as its delicately shell-pink parent.
You'll know pollination was successful when you see a swelling at the base of the bloom.  After the flower fades, the ovary will continue to swell to an inch or more in diameter. Be patient; it can take several weeks for the seeds to mature. You'll know when they're ready, because the pod will split open to reveal flat, black, papery seeds. If you rub the papery ovals between your fingertips, you'll be able to feel the tiny bumps that are the actual seeds.
 |
 |
 |
I start amaryllis seeds the same way I start most seeds indoors, by pressing them into moist sterilized potting mix in a vented, domed seed starting tray  (aka "take out salad container with holes punched in top and bottom"). Since Hippeastrums are tropical, I put them on a seedling heat mat to help with germination. Every seed sprouted! After a couple of months, it was time to pot them up individually. At this stage, most of them still look like single blades of grass, although a couple were starting to put up a second leaf. When I gently lifted each seedling for planting, I saw tiny bulbs forming! They looked more like chives than amaryllises, but I knew with time the bulbs would get bigger and acquire their dark papery skin.
 |
 |
 |
They'll grow on under the lights this year, and I'll transplant them into larger containers as they grow. To save space, I'll likely pot them in clumps. By next year, they may be big enough to spend the summer planted out in the tropical bed by my deck.
I can't wait to see them bloom!
For more information on growing and propagating Hippeastrum, please visit the DG Amaryllis and Hippeastrum forum.
For amaryllis sources, check out the bulb suppliers listed in the Garden Watchdog.
Photos by Jill M. Nicolaus. Move your mouse over images and links for more information (let the cursor hover for a couple of seconds, and a pop-up caption will appear).