(Editor's Note: This article was originally published on December 11, 2007. Your comments are welcome, but please be aware that authors of previously published articles may not be able to promptly respond to new questions or comments.)
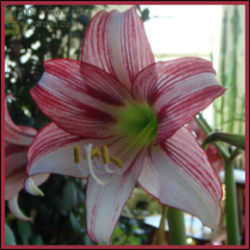
A young friend of mine helped me plant a lot of bulbs one fall, and as a holiday gift I gave her an amaryllis bulb “as big as her head.” She potted it up and was so excited as it grew... and grew... and grew! Watching the buds and blooms unfold from the tall stalk of an amaryllis plant is enchanting, no matter how many times you've seen it.
 Although many of us know them as amaryllis, if you're looking for them in PlantFiles or in online bulb catalogs, you'll need to know their botanically correct name of Hippeastrum.
These top ten planting tips will ensure that your amaryllis bulb produces the glorious blooms you're anticipating.
1. Choosing a bulb. A healthy amaryllis bulb should feel like a good onion: firm, heavy, and dry to the touch. Avoid bulbs with squashy areas that would need to be cut away. Big blotches of red “rust” can be a sign of fungal disease or mite infestation.
2. Storing the bulb. If you bought your bulb more than 6 to 8 weeks before you'd like to enjoy its blooms, you may not want to pot it up right away. The bulb can be kept dormant by storing it in a cool, dry, dark place. Don't put it in the refrigerator. If it starts to sprout, don't worry. It will be fine as long as you pot it up within the next month or two.
3. Choosing a pot. A drainage hole is essential. A heavy pot with a low, squat shape will be less likely to tip over. An amaryllis in bloom gets top-heavy! The diameter of the pot should be 3 or 4 inches larger than the diameter of the bulb, leaving just an inch or two of space around the bulb when it's centered in the pot. You can also fit three bulbs into a larger pot for a nice show of blooms.
4. Preparing potting mix. Any good, well draining soilless mix will work for an amaryllis. I add a pinch of polymer moisture crystals and a pinch of slow-release fertilizer pellets, as I would for any houseplant. Moisten the mix with enough water to barely dampen it.
5. Planting the bulb. Fill the pot halfway with slightly moist potting mix. Nestle the bulb into the center of the pot and continue filling in around it until the bulb is 2/3 covered. Gently firm the potting mix down around the bulb. The top 1/2 to 1/3 of the bulb should be visible above the surface of the potting mix.
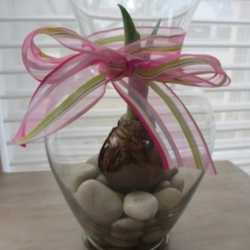
6. Dressing the surface (optional). Some people like to hide the soil surface and the top of the bulb with a layer of dry spanish moss or sphagnum moss. I've started using a layer of decorative gravel. The extra weight of the stones really helps hold both bulb and pot in place as the bloom stalk grows taller.
7. Watering the bulb. Water very sparingly around the new bulb. Try to keep the upper part of the bulb itself dry. It will not need much water until it sprouts and grows roots and really starts to grow. A bulb in a box on the shelf at the store will sprout all on its own, with no water at all! While you naturally want to pamper your amaryllis, it's all too easy to kill it with kindness. Generous watering just rots the bulb.
8. Caring for the plant. Once the bulb grows roots and starts sprouting a flower stalk and/or leaves, care for it as you would any houseplant. Amaryllis plants like bright light and lightly moist soil. Warmer temperatures make them grow and bloom more quickly. Cooler temperatures slow them down a little.
9. Turning the pot. This is very important if you don't want your amaryllis to grow toward the window until it leans so far sideways that its pot falls right off the table. The tip of the bloom stalk will always grow toward the light. Give the pot a quarter turn once or twice a day, turning it so the tip of the stalk (if it's leaning at all) points away from the window.
10. Supporting the bloom. Most amaryllises bloom on very tall stalks that usually need some support. I've used everything from chopsticks and twist-ties to bamboo garden stakes and twine. The blooms themselves will last longer at cooler temperatures (60-65'F) out of direct sunlight, but they generally put on a good, long show regardless.
11. Throwing it away. No! Don't! Too many people toss out their amaryllis plants after their holiday blooms have faded. Continue treating them like any houseplant, and enjoy their foliage. In the next "Amaryllis 101" article, we'll discuss how to grow them on until next year for more, bigger, better blooms!

 An amaryllis bulb takes 6 to 8 weeks to sprout and bloom. But half the fun of these stunning flowers is in the building anticipation as you watch them grow. They’re worth the wait!
So when you see those brilliant photos posted over bins of enormous brown bulbs, don't just pass them by. Amaryllis bulbs are fun and easy to grow, step by step.
I hope you'll pot up at least one amaryllis bulb this year, for glorious winter color and blooms “as big as your head!”
For more information, see the Dave's Garden Amaryllis and Hippaestrum Forum.
Need more amaryllis adventure? Try growing them from seed you've saved from your own plants!
Photos and illustration by Jill M. Nicolaus.