Large unique planting containers can be eyecatching additions to the garden. Ever resourceful (read cheap) I look for alternatives to buying pricey garden decor. I had saved several styrofoam boxes from food shipments. The thick foam had good proportions, similar to those of many stone troughs I saw on the web. But no mere coat of spray paint could fully disguise the cooler's styrofoaminess. (Spray paint can actually melt styrofoam.) I wanted to coat the foam, camouflage it, and make it sturdy and durable.
Several durable garden art projects, using a material called QUIKWALL®, gave me hope. QUIKWALL® is a concrete product which includes reinforcing fibers. The manufacturer, Quikrete, refers to QUIKWALL® as a surface bonding cement. QUIKWALL® is said to give a "water resistant and decorative coating" to walls. Quikcrete's website also describes the use of QUIKWALL® in several landscape projects.
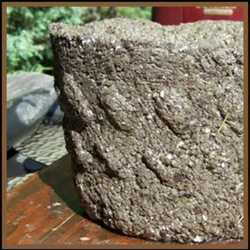
Happily my husband was willing to lend a hand, and we successfully made our first faux stone trough. We finished the project with a minimum of aggravation and in under two hours. Our result: a faux stone trough, somewhat similar to a hypertufa in appearance but even lighter in weight. It will serve as a small water feature in a shady garden. I could add a small pump and have a miniature fountain.
I'll give you the basic construction plan. I have no doubt our readers will have ideas for improvement. The trough can be dyed using concrete dye or stain, or painted. Stones, tiles, glass or shells could be pressed into the surface. The basic foam box can be cut easily to vary the proportions of the final product.
"Stone" Trough Project Plan
Supplies
QUIKWALL®, one fifty pound bag, $13; about half the bag completed one medium cooler
Styrofoam cooler; mine measured about 15 inches by 12 inches by 8 inches, with straight sides
Large trash bag
Newspaper -several sections you will open up to make a work area under the cooler.
Mesh drywall tape, used to cover seams, about #5 per roll; one roll will do several projects
Plastic tub
Sturdy mixing tool
Plastic gloves- thin blue ones worked fine for us but some recommend heavier gloves.
Water
A work area at convenient height; the cooler will be placed on it and stay there overnight at least.
Safety note: Cement products are caustic. Beware of the dust of the dry product, and don't touch wet cement with bare skin.
Instructions
We set up for the project on a picnic table in the shade. (The concrete should cure slowly, so do not work in the sun.) Split open the plastic bag to make a large plastic sheet, and cover the work area. Then add a large thick layer of open newspaper sheets. This protects the plastic and helps you turn the cooler if necessary.
Place the cooler on the table, open side up. Now apply mesh tape to the outer sides, inner sides and over the lip. The mesh helps the QUIKWALL® stick to the cooler. Make vertical strips starting at the outside bottom corner, go up over the rim, and down the inside of the sides. You do not have to cover the entire inside bottom. Since that is flat and enclosed, the concrete has no choice but to stay where you stick it.
Scoop about eight or ten cups of dry QUIKWALL® into the pan. Then add water slowly. Wet the concrete until it's just thick and workable, kind of like peanut butter. This texture can be formed into patties and pressed onto the surface of the cooler. (We used three or four batches this size to do this cooler.)
Grab handfulls of the mix and press a quarter-inch to half-inch thick layer over the entire bottom of the cooler. (1/8 inch is the minimum thickness stated on the bag for use on block walls.) This is an easy step and gives you a chance to get a feel for the work. As you complete each area, smooth out the surface; watch for telltale finger marks that could make your concrete look more like a play dough creation.
Work your way up on the inside wall. The mix may peel away at first but don't panic. Continue to press and momentarily hold the QUIKWALL® on the side. It will firm up and stick on the mesh. Work all the inside walls up and sightly over the rim.
Now start on the outside. Start at the bottom and let the table support the QUIKWALL® at first. As you work, the concrete stiffens and sticks to the cooler. Work your way around and up. Work over the edge and meet the QUIKWALL® from the inside. Round or slightly square off the edge as you like. Also check the bottom edge where it rests on the table. You can still work the concrete to round the bottom edges. Reaching under the newspaper sheets lets you mold the concrete a bit.
The QUIKWALL® will be pretty firm by this time. Wash your tools and pan promptly if you plan to reuse them. Pull the plastic bag up over the trough and cover it completely. Concrete is stronger when it cures slowly. It will cure even though it is not exposed for drying.
The next day, open the plastic and peek at your creation! At this time you may carefully move the cooler to another location to finish curing. Keep the trough closed up in its plastic for, oh, let's say a week. The QUIKWALL® bag doesn't state a time for full cure. Concrete is strongest when it dries gradually.
The picture at the top shows our finished trough. I look forward to watching it age gracefully in my garden.