(Editor's Note: This article was originally published on March 20, 2007. Your comments are welcome, but please be aware that authors of previously published articles may not be able to respond to your questions.)


Creating A Plumeria Collection
By Clare Corre
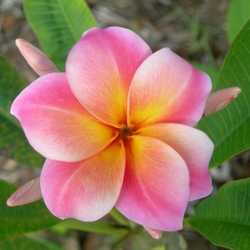
Creating your own plumeria collection can be fun and exciting! You can start plumerias from seeds, cuttings, and grafts, or you can buy plumerias as established trees. Many of the beautiful plumeria species and cultivars available are named and are registered with the Plumeria Society of America (PSA); however, there are many cultivars which aren’t named or registered, and that makes them no less beautiful, significant, or enjoyable. Colorful and striking plumerias are continuously being discovered - and created- in Thailand, India, Australia, Singapore, Mexico, and here in the United States among other places. These new plants are often seedlings.
Plumeria rubra seedlings can resemble their pod parent, especially if the flower self-pollinated; or they can resemble both the pod parent and the pollen parent; or they can resemble neither parent! That is what makes seedlings so interesting: a flower may be created with colors and shapes that match no other. On the other hand, the seedlings of other plumeria species -- such as P. pudica, P. obtusa, and P. alba -- often come true (i.e., look like the parent tree) and often bear white flowers, especially if the flower self-pollinated; however, it has been demonstrated that plumeria species can be crossed with one another.
One way to build your plumeria collection is to sow seeds, root cuttings, practice grafting, and buy established plants when it is affordable. Established plants can be quite pricey, and since we gardeners enjoy creating life where none was before, it is very rewarding to start trees ourselves. However, in addition, be sure to check your local Home Depot, Target, Wal-Mart, and local nurseries in the summertime because, oftentimes, you can find well-rooted one-gallon trees for around $10.
First, let me say that I am a hobbiest and not an expert, and what follows is the result of my own opinions and assessments, which are continually evolving as I learn and grow myself. There are many ways to propagate plumerias, and discovering your own way of doing things can be half the fun. My only intention here is to share with you how I do things and what I have learned, living in my particular climate of Southern California. Certainly, what works for one person may not work for another, and one may have to make certain adjustments if they live in a colder climate than I do. My only wish is to share my experiences and joy and to help give you some general guidelines so you can be well on your way to starting your own plumeria collection.
Seeds
| Starting seeds is easy. The seeds themselves have cute little tails which stick up out of the soil when you plant them. Be sure to use a well-draining medium such as a quality potting soil which has Perlite or Pumus in it for good drainage. Cactus mix will work well also, depending upon the brand. The seeds need to be plumped up with moisture to sprout but not too much moisture, or else they can rot. They love heat and moisture so, if you start seeds indoors or in a greenhouse in a cool season, be sure to place them on a heat mat or a warm surface so they can stay toasty warm. Additionally, a light source directly above them will give them the heat and light that they need to sprout. Seeds can sprout in any time period from a few days to a week or more. Be sure to mist the seedlings frequently under these toasty warm conditions. I mist when the top of the soil looks dry. Misting also helps the seedlings to shed their seed coats when they emerge. You can assist with this seed coat removal very carefully so as not to harm the fragile seedling inside. I find that a pair of tweezers and a steady hand are helpful if this assistance becomes necessary. Misting also softens the seed coat so that it can more easily be removed.
Seeds can also be started in moist paper towels. I moisten a paper towel with hot water and then gently wring it out so it is not too wet. I then fold it into quarters and place the seeds between the sheet layers, making sure there is good contact. I then put the paper towel in a plastic sandwich bag, write the date on the bag, and place the bag somewhere warm and light. If it is warm and sunny during the day, I will place the baggy in the sun on warm concrete or on a cookie sheet. The heat seems to do wonders for the seeds, which plump up with moisture in a matter of a day or two. I make sure that I bring the seeds back inside before late afternoon when it starts to get cool out. After the seeds have plumped, I transfer them to a community growing container until the seedlings have one or two sets of true leaves, and then each will be given their own individual one-gallon container.
I don’t worry about over-potting with seedlings like I do with cuttings because seedlings, in general, have stronger root systems than cuttings have, and the more room that seedlings have to grow, the faster and healthier they tend to be. A small container can stunt the growth of a seedling. However, it is still important that the seedling be placed in a medium which is well-draining, and watering should be done with care so as not to make the potting soil too wet and unable to dry.
I have found that seedlings love water and respond well to frequent watering during the warm seasons of spring, summer, and fall, but special care should be taken not to overwater during the winter if the seedlings are outside or in a greenhouse and if temperatures dip below 50, especially while they are young. Seedlings can tolerate some cold temperatures, but they seem happiest in the heat and humidity of a greenhouse during the winter. When spring comes, the seedlings can go into full sun. If you start seedlings indoors and only give them artificial light, it is a good idea to slowly acclimate them to full sun by placing them in filtered sun for a day or two. If you do happen to get sunburn on the leaves, new ones will sprout quickly, and the little tree will readily adapt.
Seedlings can be fertilized when they are young, and additional supplements such as Spray ‘N Grow, Superthrive, Epsom Salt, Fish Emulsion, and Start are claimed to be beneficial. I fertilize my seedlings when I fertilize the rest of my plants, and they get small doses of what everything else is getting. I have started fertilizing and providing supplements to seedlings as early as two months, but some growers prefer to wait a little longer, and some growers prefer to start fertilizing at half strength to avoid getting what is known as fertilizer burn.
There are other methods to starting seeds as well. I’ve seen growers start seeds in food storage containers and plastic drinking cups with little humidity domes. As I said earlier, experimenting and finding out what works for you can be half the fun! There is no limit to your imagination.
On average, seedlings can take 2-3 years to flower for the first time, and sometimes they can take 4-5 years so patience is required when working with seedlings. |


Cuttings
Starting plumeria from cuttings can be a fun and rewarding way to start a plumeria collection. A typical cutting is eight to twelve inches, but larger cuttings are easy to root as well. You can also root smaller cuttings, but cuttings less than six inches may be challenging. Cuttings can be single-tipped, multi-tipped, or center cuts. The center-cut cuttings will grow branches from just below the cut before the leaves come. It is best to start with a healthy cutting because a stressed cutting can also be challenging to root.
When a cutting is first taken, it can be immediately dipped in a rooting hormone powder such as Roottone, Hormex, TakeRoot, Clonex, or any other rooting hormone. The cutting should be put somewhere cool and dry, where there is good air circulation, while the end is allowed to heal and callous. I like to put mine out on my back patio, where there is some filtered sun and good air circulation as the breeze comes through. After a few days to a week, the cutting is then ready for planting or water-rooting.
| Water-rooting can be tricky, especially if the water and outdoor temperatures aren’t at optimum temperatures. I’ve had success rooting cuttings in water when the water and outside air temperature are both warm day and night, but some cuttings are resistant to water-rooting and will rot readily. It is often convenient to water-root if you have a large amount of cuttings which can’t be potted into containers right away. In this case, large glass jars or vases or even plastic buckets can serve to water-root many cuttings at once. The water should be changed frequently and should only cover the bottom two inches of the cuttings.
Some growers add Superthrive or another rooting hormone to the water and find that this helps encourage rooting. At the first sign that roots are forthcoming, I pot each cutting in its individual one-gallon container. When water rooting, the roots come from the cambium, which is the layer of meristematic tissue capable of producing new cells. Although water-rooting can be practical in some cases, I prefer to root cuttings in soil. |

I mostly root cuttings in one-gallon containers if they are of average length, but the larger cuttings prefer two- or three-gallon containers, and the very large tree-size cuttings can even be rooted in five-gallon containers. I fill the container with well-draining potting soil and make a small round opening in the center with my fingers. I then put the cutting in so that the bottom two or three inches of the cutting are beneath the soil line and fill in the hole with remaining potting soil and press down firmly to eliminate any air pockets and to hold the cutting in place. I then water each newly planted cutting with water which has a small amount of Start added, which has Vitamin B-1 in it as well as some rooting hormones and Yucca extract, to ease transplant shock. If you don’t have Start in your area, the B-1 that Home Depot and other chain stores carry will work just as well. Superthrive is also used for this purpose. I then put the cutting on some hot concrete in full sun if it is spring, summer, or fall. If it is wintertime, I put it in the warm greenhouse.
If you are starting cuttings inside your home or inside a greenhouse during the winter, a heat mat is often recommended for cuttings as heat is very important to the rooting process. After the initial watering at planting time, I will only water when the soil looks dry. If the cutting is rooting in full sun or intense heat, it is important to keep the cutting well-hydrated so that it does not become desiccated. For this reason, some growers prefer to root their cuttings in filtered sun or part shade. Misting is also beneficial in these conditions.
Sometimes it is necessary to stake a plumeria cutting, either to keep it supported or to straighten a crooked one. I have received cuttings in the past that I was sure would make good boomerangs! This stake is only temporary and can be done away with once the cutting has rooted and/or is straightened. When inserting the cutting into the potting soil, insert the bamboo stake or support in at the same time and tie it tightly against the plumeria with a stretchy green plastic tie at the base just above the soil line. Tie a second and third tie at the middle and upper portion of the cutting, pulling until you feel resistance from the cutting and then tying tightly. Over time, the second and third ties will need to be tightened again until the plumeria cutting is perfectly straight. After the cutting is straight, no further support is needed. Straightening a cutting after it is already rooted is probably easier because a rooted cutting won’t move around like an unrooted one may. This straightening can be done when transplanting from a one-gallon to a five-gallon container. It is often nice, however, to place a bamboo stake in with the cutting being rooted so that the roots can form around the stake as it roots. One or two plastic ties are often sufficient to hold the cutting in place. This way, no roots are broken as can happen when you insert a stake after a plumeria is rooted. Then, after transplanting to a larger container, the process of straightening can continue, if necessary, by adjusting the ties and tightening. Cuttings generally root in 60-90 days, but some can root much sooner given optimum conditions. I’ve had great success rooting cuttings when the weather is hot during the summer and fall in my climate. When the weather is cool in the winter and early spring, cuttings can be challenging to root. June Gloom, as it is called, can be a hard time to root cuttings, when the sun doesn’t show up for weeks and everything is cold and damp. Potting soil which becomes cold and damp can encourage a cutting to rot. Even in a greenhouse where the temperatures are warm or hot during the day but drop down below 50 at night can lead to cold and damp potting soil. I have found that it is best, when rooting cuttings in a greenhouse, to keep the overall temperature above 50 and higher if possible. The soil temperature of 80 seems ideal. It is important to keep the soil temperature high for the rooting process to be successful. In this effort, heat mats can be beneficial in raising the soil temperature. A soil thermometer will take the guesswork out of figuring out the soil temperature. |
|


After a cutting has rooted, it can be repotted from its one-gallon container to a three- or five-gallon container. You can tell when a rooted cutting needs transplanting when you see that the soil dries out very quickly. Roots sometimes grow out the drainage holes of a container that needs repotting. If the roots have been circling at the bottom of the container while it was rootbound, you can gently pry them loose with your fingers and lay them over a small mound of potting soil inside the new larger container. Watering with some Vitamin B-1, Superthrive, or Start will help to ease any transplant shock that might occur. In general, plumerias are very resilient and can seemingly take abuse which other trees cannot so don’t worry if you break some roots in the process; they will grow back quickly.
Due to plumerias sensitivity to cold and damp soil, the best time for rooting cuttings is during the warm seasons, whether they are spring and summer for you or summer and fall. The same is true for repotting. If a plumeria becomes rootbound in late fall, I usually wait until the following spring to repot so that I’m not repotting right before winter. If a small root ball is sitting on soil which is unused by the roots and then winter comes with rain, the unused soil can become waterlogged, and drainage can be negatively affected, causing bacteria to form and eventually attack the otherwise healthy root ball. This is why it is best to avoid repotting right before winter and why it is best to avoid overpotting. When I first started gardening, I thought I would save myself some work and put a one-gallon plant into a 15-gallon container. I soon learned that doesn’t work with most plants, trees, or vines unless their growth rate is extraordinary like that of Brugmansias or Passifloras. Drainage is soon impinged as the unused wet soil beneath the root ball turns foul. One indication of this is when a container becomes unusually heavy. I have been told that there are places like Texas and Florida where there is so much heat that overpotting is not an issue so those gardeners living in those climates may be able to save several repotting steps in that regard, but I imagine that one would have to be extra careful not to overwater in those circumstances.
Grafts
| Learning to graft can be fun and exciting, but it takes patience and practice. Grafting is an efficient way to propagate a plumeria and takes less time than rooting a cutting.
Sometimes, when a cutting is stressed from traveling or other conditions, it will prove difficult to root. Having this cutting then grafted is often a great solution to salvaging the cutting. Also, some species cuttings can be difficult to root and are often grafted for this reason. Cuttings which are too small to root are often easily grafted. One can even graft a single eye or bud of one cutting onto another cutting. This is called bud grafting, and this method has been perfected by plumeria growers in Thailand.
One can also make a “tree of many colors” by grafting branches of different cultivars onto one tree. It is a spectacular sight to see many different colored flowers in bloom on one plumeria tree at the same time. What a space saver!
As a brief overview, grafting is done fairly easily by making a diagonal cut with a sharp sterile knife in the plumeria cutting to be grafted (scion) and a matching cut in the root stock, which is often a seedling due to the strong root system, and joining those two pieces while ensuring good sap flow and good contact. A “V” cut can also be used. The two pieces are then kept tightly together with pins/needles, rubber bands, twine, electrical tape, staples, or even hot glue or a combination of these things. The union is then protected from the elements by being wrapped in electric tape, a green plastic tie, or some other protective material. Leaf growth on the scion is an indication that the graft has taken.
If grafting is something that you don't want to attempt or that you are not good at, you can send your cuttings to Luc of Florida Colors Nursery to graft for you. He charges $4 a graft, and the sender is responsible for postage both ways. Many people would gladly pay for this service to have the peace of mind that comes with knowing that precious cuttings will have roots in a matter of a weeks. |


Buying Plumerias
The saying ‘Buyer Beware’ certainly applies here as it does with most other consumer purchases. Ebay is a risky place to buy plumeria cuttings because it is hard to know who is reliable and who is not, and feedback doesn’t often tell the whole story. The reason that the feedback doesn’t often tell the whole story is that you may receive a cutting in the mail and not see it bloom for a year, and by then, it is too late to leave feedback that the plumeria you received is not the plumeria cultivar or color that was advertised and that you purchased. You may also receive cuttings that are not healthy and won’t root. Be sure to check around with other plumeria growers if you have any doubt about whom to buy from on Ebay.
There are certain vendors which I find to be unquestionably trustworthy and reliable and which supply me with most of my plumerias -- these include Florida Colors Nursery (Luc and Carol), Brad’s Buds and Blooms (Brad Willis), HawaiiSandy on Ebay (Sandy Lavarias, daughter-in-law of Jim Little), and Jim Little Nursery & Farms (Jim Little). There are other reliable sources as well. I find that the best recommendation is by word of mouth so it is up to us consumers to spread the word about reliable sources as we find them.
Otherwise, when you are shopping and buying a plumeria in person, such as one you might find at a local nursery or Home Depot, be sure to check the plumeria’s overall stem color and texture. Any signs of wrinkles, soft spots, dark spots, holes, or discoloration can mean trouble and can indicate that the plumeria is not healthy. You can reach into the base of the plumeria tree with your fingers and test for firmness just beneath the soil level. Rooted cuttings should be firm and healthy-looking, and the leaves should look healthy and be free of any insect damage. Be sure to inspect the growing tip as well for any problems; a shiny tip is a happy tip!
Books and sources that I can recommend include:
- DavesGarden.com's PlantFiles;
- Plumerias in Hawaii by Jim Little;
- The Handbook of Plumeria Culture (Flowering Tropicals for American Gardens Series) by Richard Eggenberger; and,
- The Exotic Plumeria, a pictorial, Volume 1 by Alan W. Bunch.