Fermentation is a low-energy and efficient way of preserving food that increases shelf life and adds significant nutritional elements without the need of refrigeration or complicated equipment. This was a common method of preserving food many years ago and is still used in rural and undeveloped areas.
People are just starting to rediscover the health benefits of adding lacto-fermented fruits, vegetables and milk products to their diets. The proboitcs created by this process are beneficial bacteria that inhabit the gut, aid digestion, balance sugar levels and strengthen the immune system.
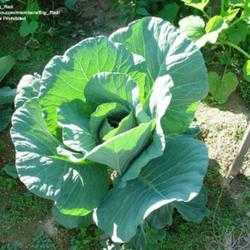
Home-made sauerkraut is one the most basic foods known to man. It had very humble beginnings as simply a way to preserve the harvest for poor, common folk who had very little besides their vegetable gardens to get them through the winter. These peasants combined salt and cabbage to create a tasty substance that was in fact more nutritious than cabbage by itself. It sustained sailors on long sea voyages and prevented a number of ailments caused by vitamin deficiencies. Fermentation increases the C and B vitamins along with enzymes that aid digestion and contributes to overall good health.
There are a number of internet articles and books available that explain the process in detail, but the book I used: Making Sauerkraut and Pickled Vegetables at Home is quite thorough and easy to understand. I also had a couple of conversations with Glen at Yoder's Country Cupboard when I was in Mountain View, Arkansas this October. They sell natural and bulk foods and are a wealth of information about getting back to basics. With this book and his info in hand, I felt that I could tackle this project with no problems. (I also purchased the half-gallon mason jars from him...they're harder to find than you'd think)
Many of you might ask, why not just purchase sauerkraut from the grocery store? The problem is, it has most likely been pasteurized, which kills any bacteria that it may contain. This makes it as nutritionally empty as most anything else that comes from the supermarket. Commercial sauerkraut has in all probability been chemically fermented and true anaerobic activity never happens.
Anaerobic fermentation is a process that takes place without air and the fruit or vegetable is usually submerged in a brine solution that kills undesirable bacteria and pathogens. There are specialty crocks on the market with water channels that form an airlock, but large mason jars with a bit of modification can serve the purpose with just a little extra equipment. These jars make it easier for small batch processing and are much more attractive to households with fewer members. I spent about $30 on everything I needed to create my sauerkraut and it will serve me for years. This equipment was an updated version compared to the items my grandmother used. Her sauerkraut making tools consisted of an home-made wood mandolin with a box to hold the cabbage head, an old stone crock, a ceramic plate and a large white rock. The crock held the shredded cabbage, the plate kept the pieces from floating and the rock sat on top of the plate to keep everything submerged. My mother remembers the rock sitting on a shelf in the cellar all year until it was time to make the kraut, and no one was allowed to touch it. She said that the kids loved 'kraut day' and often ate handfuls of the salty cabbage right from the slicing bowl. It was tasty that way too!
I used certified organic green cabbage and my favorite pink Himalayan sea salt. That is all that will be in my sauerkraut; nothing else. Red cabbage is nice, but the green cabbage is much more tender, so it is a better choice for sauerkraut.
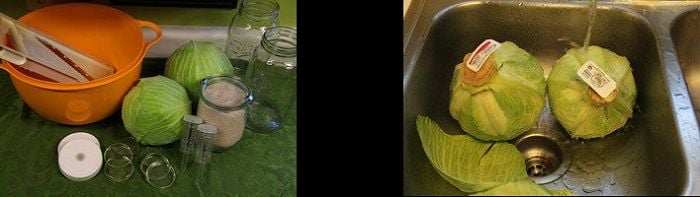
You will need cabbage, salt (preferably kosher or sea salt) half gallon mason jars, special fermenting lids, glass weights and airlocks. The lids and airlocks can be purchased anywhere brewing supplies are sold or from a number of sources on the internet.
Wash everything well (this includes your own hands!!) and sterilize your jars. Wash your cabbage and remove the outer leaves, but set them aside as they will be needed.

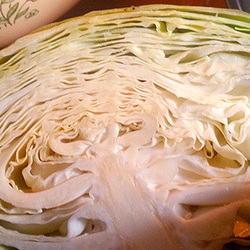
Quarter and core your cabbage. If you have a mandolin, shred the cabbage very thin, or slice it into fine shreds using a kitchen knife. Place the shredded cabbage in a large, non-metallic bowl and mix in about 3 tablespoons of salt for 2 heads of cabbage. Use a non-metallic spatula to bruise the cabbage so that it starts to release water.
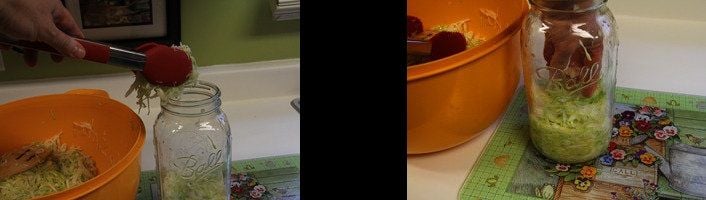
I let my cabbage and salt sit on the counter for several hours so that the salt could pull moisture from the vegetables. When you start to see water in the bottom of the bowl you can start filling your jars. As you add the cabbage to the jars, tamp it down with a clean fist to pack it tightly in the jar. You should see water start to cover the cabbage shreds.
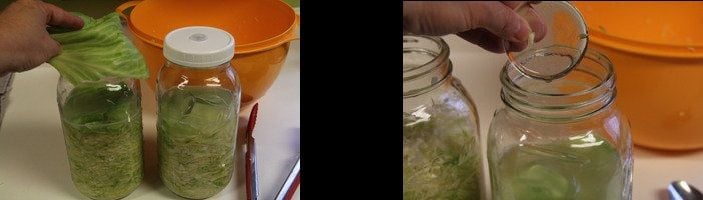
Water should cover your cabbage by an inch or so, so if it hasn't reached that level, add a little water to make up for the difference. Boil a couple cups of filtered water with a teaspoon of salt and use that. (chlorinated water will kill your good bacteria) Fold your saved cabbage leaves to tightly fit in the jars and cover the shredded cabbage. This keeps the shreds from floating to the top. Leave at least an inch of empty space between the water and the top of your jar. I left a couple of inches. I purchased glass weights to help hold the fermenting vegetables under the water and added those once I had the shredded cabbage covered with the larger leaves. As long as the vegetables are covered with water, the fermentation process keeps them from decaying. A zip-top baggie filled with salty water would do the same thing.
I cleaned the inside of the jar to remove any pieces of cabbage from the sides. This also prevents decay.
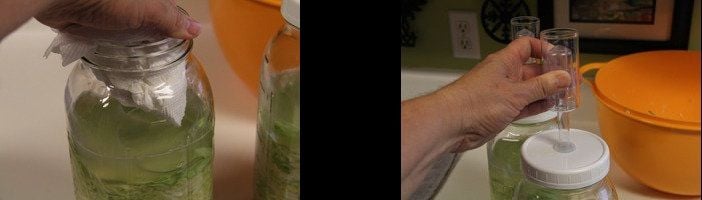
Cover the jars with the fermenting lids and place the airlocks in place.

Fill the airlocks with filtered water. This creates a barrier that prevents bacteria from entering and lets gas escape. Place your jars in a dark cupboard and leave them for about 4 weeks.
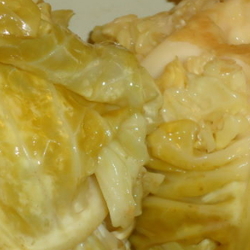
Making your own fermented vegetables is an easy process and your family will reap the benefits. I opened one of my jars that had been 'cooking' for the last month to finish this article (I had to make sure everything worked!) and was thrilled. The sauerkraut had a pleasing nostalgic scent that I remember from my grandmother's kitchen. I had no idea that the smell could transport me back to that old Victorian home and days gone by. Memories of yummy lunches with home-made vegetable soup and yeast rolls made in her old iron skillet came back just by the aroma. The taste was more delicate and less salty than the commercial stuff as I stood at the counter and ate several handfuls...yes, with my fingers! It was awesome.
Fresh fermented veggies are more healthful anyway. If you cook with them, add them after everything else is cooked and heat them to just under boiling. You'll retain more of the good bacteria that way. For the most noticeful health effects, it's best to eat a little lactic acid fermented food each day, rather than a large amount infrequently as this helps maintain healthy probiotic levels in your system. Now that I've taken the plunge, I'm anxious to try more fermented treats...radishes, beets, grape tomatoes and cauliflower all sound like great possibilities and with the simple equipment I now have, I see no reason not to have something fermenting at all times. These days,our diets largely consist of processed and nutritionally empty foods, so why not use this simple process to add some much needed elements to your family's dinner table? I was surprised at how easy it was.