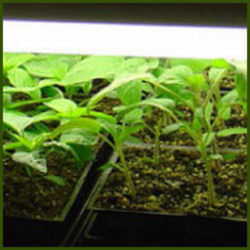
For some types of seed, warmer temperatures are critical to germination. I successfully used the warmth from my oven light one winter to germinate two precious seeds of Vigna caracalla (Snail or Corkscrew Vine). While carefully monitoring and adjusting the temperature by propping open the oven door just so with a folded towel, I made up my mind: I wanted a  seedling heat mat!
I ordered two heat mats and a temperature controller a couple of years ago. I love them! Seeds all but leap out of the seed starting trays in half the time it previously took. My seedlings look so much stockier and healthier when it's time to plant them out. Although there are DIY alternatives to "real" seedling heat mats, I fell for the appeal of something I could unpack, plug in, and put to work right away.
 Seedling heat mats are usually sized to hold one, two, or four of the 1020 size standard nursery flats. You can plug multiple mats into a typical thermostat controller (check specifications for max wattage). [1]
Why get a controller? Seedling heat mats typically raise the temperature of your flats or pots 10 to 20°F above ambient (room) temperature. My basement occasionally warms to over 70°F on a sunny day, and a 20°F rise in temperature on top of that could mean the death of my seeds. A controller to maintain the temperature at an even 78°F seemed like a good investment.
Here's a seedling heat mat and controller you can buy.
If the prices on seedling heat mats and controllers make you wince, there are some DIY alternatives. You can supply some bottom heat simply by putting your seed flat on top of the refrigerator, television, or other warm spot. A 40 watt incandescent bulb positioned just under a metal shelf makes a good heat source for a seed pots placed on the shelf.
You can also construct a light box, an enclosed space warmed by one or more incandescent bulbs. If you don't want to wire your own sockets, you can use a pot light, desk lamp, or clamp-mounted fixture. Make sure to keep wiring away from possible wet areas, and leave plenty of space around the bulb. The enclosed space can be as simple as a shelf of your existing light stand, wrapped in plastic sheeting with front flaps to allow easy access.
Monitor the temperature inside your light box to figure out what wattage bulb(s) will give you even heat of 75 to 80°F. Putting a thermometer into a pot of moist potting mix will let you monitor actual soil temperature. If you are comfortable with wiring projects, you can install a thermostatic switch to turn the lights on and off as needed.
Here's a great digital soil thermometer.
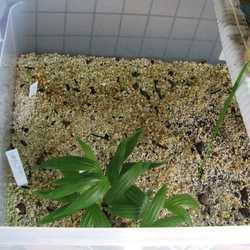
Heat cables are often much less expensive than seedling heat mats, especially for larger numbers of seedling flats. They are designed to be buried in flats of sand or gravel, with the flats of seedlings placed on top of the material for even heat distribution. A similar DIY bottom heater option uses lengths of Christmas rope light (not LEDs), buried in clean kitty litter. The amount of heat  provided is regulated by the length of rope light. [2]
What about that old electric blanket? No! Electric blankets and household heating pads are not designed for use 24/7 and are not for use in potentially wet environments. All those safety warnings are on them for good reason. Even if you have been using one under your seedlings for years without burning down the house, please consider a safer alternative.
Whether you choose to use an "official" seedling heat mat or a DIY alternative, please be safe. This isn't the time to just throw something together and see if it works. Use heavy duty grounded extension cords and GFI outlets. Get expert advice if you ha ve any questions
How long should seedlings stay on the heat mat? In my experience, pepper and basil seedlings benefit from a couple of weeks on a seedling heat mat, but after up-potting they do just as well on an unheated shelf in my 60-70°F basement. Tomato seedlings sprout almost overnight on a heat mat but must be removed from the heat after the first sign of germination, or they will become very leggy.
Germination instructions for many seeds recommend growing on the seedlings at a cooler temperature once they have sprouted. Since most seedlings won't need to stay on the heat mat long, a single heat mat can help start enough seeds to fill dozens of flats. See Tom Clothier's germination database for temperature requirements of many types of seeds.  Seeds that need a warm start (70°F more) all seem to do well for me when I set my heat mat controller to 78°F.
Start with plants that appreciate a longer head start. When they're ready to transplant into larger pots or cell packs, it'll be time to put the next round of seed starting trays on your heat mat. Flowers like Torenia (Wishbone Flower), Geraniums, and Wave Petunias are among the first on my sowing schedule, followed by peppers, then by basil and tomatoes.
Whether you buy a seedling heat mat or put together a DIY alternative, I hope you'll consider adding extra heat to your seed starting shelf this winter. The results will amaze you!
For additional information on seed starting, see my previous article, Seed Starting 101: Setting up Light Shelves. Growing your own plants from seed can be both cost effective and fun. Nothing beats the satisfaction of cutting flowers or picking heirloom tomatoes from plants you started yourself from tiny seeds. Go, sow, grow!
[1] Thanks to Park Seeds for additional information about the seedling heat mat and thermostatic controller that they offer. They gave me good advice and assistance when I purchased mine. You can check them out in The Garden Watchdog.
[2] We've had some great discussions about heat mats and DIY alternatives on the DG Propagation Forum (subscribers only). I'd especially like to thank Heathrjoy for her contributions, including posting the link for the rope light soil heater.
When you purchase through links on our site, we may earn commissions at no cost to you.