(Editor's Note: This article was originally published on April 4, 2007,)
I've had a few people ask me how to do cuttings to get more plants. I thought I'd share a few paragraphs here of what I've learned.
I'm no writer & definitely no expert at plants. I've gleaned much from many other gardeners and read a lot. My daddy's love of nature gave me a good start. His grandmother gave us a part of history in the "Trail of Tears" and his mother passed down that knowledge of wildfood and natural remedies to her children. In Arkansas my daddy used to go with his mother to gather these gifs from God and it is from these "roots" that I have come.
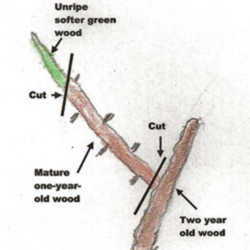
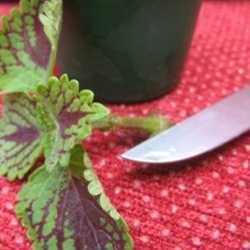
1-Most anything can be cut & get started as a new plant. In my practice when taking cuttings, I find more success in rooting if they're taken from hardwood. This means that the older stems have a tougher outer "bark" and sometimes even looks woody, like bark. These are the more "substantial" stems to use for rooting. I've found that most of the time a stem can be cut for several hours before using it. Keeping it moist helps insure the rooting process for later & you can do this by sticking the end into a moistened paper towel or even some water (gardening tip: always have some kinda plastic bag with dry paper towels in it). If I can't keep the stem moist, I try to take a long enough cutting so when I get ready for it, I can cut another length off it again to get back to a stem that hasn't dried out. Of course SOME plants need a drying-out period so they don't rot. Examples are tops of pineapple & canes (Dracaena, dumbcane, etc.) Also, when taking a cutting, it's best if you keep it only a few inches tall 4-6" with the leaves (photosenthesis for keeping alive). Snip off the top if you must - too long of a stem makes a difficult adjustment to the shock of cutting & will usually die.
2-Once you've cut the stem (always at an angle) make sure it's just below a node (where leaves join the stem). Strip (pull off or pinch off) all the leaves on the stem that you plan on having in the soil for rooting. Don't pull downward on the stem, that could injure the stem. The nodes are where rooting will mainly occur although with some plants the rooting can occur anywhere on the stem. Some stems are warty, these are usually areas where rooting can occur.
3-Have your pots ready. They should be clean, small plastic pots (plastic doesn't dry out as quickly). Most plants don't like too much room for their roots to wander about. Give cuttings (1 to 4 stems of the same plant), a little bed of their own. I find that small starting pots don't need gravel in the bottom. Just buy good potting soil, dont' use "dirt" from the yard. I like buying 40 pounds of Miracle-Gro potting soil. Fill the pots then shake or thump them to settle the soil well. Poke holes into the soil either with your finger or a dibble stick, which is a finger-sized stick! haha
4-I generally use a rooting hormone, several kinds are out there but a brand name is "Rootone" that you can buy from Lowes or the Home Depot in the garden center (the container is only an ounce or so, about the size of a larger baby-food type jar). After freshly cutting the stem, dip the end of it so the node gets a dusting of the hormone over it. The more nodes to get the hormone, the better! Tap the stem gently (you don't need but a light dusting) then put it deeply (even if the end of stem hits the bottom of the pot), into an open hole, in the soil. Press the soil firmly (not hard) around.
5-Water well after finishing your cutting(s). Don't worry that the soil has now settled to 2/3 or 3/4 of the pot. This gives plenty of room for spraying water into the pot, letting it soak-in good. Water well at least every other day (depends on the weather). They like moisture but not standing in it so make sure they drain well. Having those trays for plants is really nice, so the water doesn't pool around the pots. Watering from the bottom is the best, it will keep fungus from starting on top of the soil (dampening off kills young stalks). If soaking from the bottom, of course make sure there's complete drainage afterward.
6-Have your starting area in a mostly shady spot, near the ground. These starting plants are putting their roots out, not trying to really "grow". A very few hours of sun is ok but no more. Eastern sun is healthiest. I have my bed on the W side of my house, it's between houses so the only sun is straight overhead for about 2 hours. They must also stay warm. A chilly spot is a deadly spot.
7-Some people like to buy a low number liquid fertilizer for starting their plants. I think the first one pertains to roots so it would be like a 5-0-0. I'm not sure though. I also have read a vitamin has been known to work well in helping plants make roots (something like B16?). There again, I don't recall exactly.
Sometimes when I trim plants back, I've been known to stick those stems right back into the ground around the base of it. Many times I've happily found little plants that's adjusted well & lived from those cuttings! So not always, does there need to be such care taken. But if I'm wanting to be more sure of success, the above steps are generally what I've found to work well.
I hope this has helped someone if they've had questions about getting starts from cuttings.