The first thing to know is that growing daylilies from seed is easy. They're tough plants, and they're not fussy about germination or culture requirements. The second thing to know is that you'll have to be patient. It will take at least until the following year, sometimes longer, before you will see a bloom and know just what it is that you've grown out. Several more years may be needed to really evaluate a new seedling's potential.
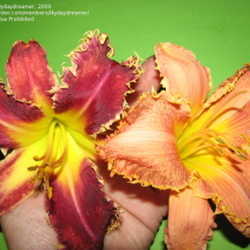
 As with many plants, daylily genetics can get complicated. The blooms of an offspring may look almost exactly like one parent or the other, or you may get something quite unique. Other characteristics are also passed along, affecting foliage, height, flower form and substance, bud count, and so forth. It's a gamble. If you like the parent plants, you'll probably like most of the seedlings, too. Some may be truly exceptional, and some may be "dogs," with muddy colors or other undesirable traits.
Give your daylilies a good head start by germinating seeds in winter and growing them under fluorescent lights. Many people start seeds simply by sowing them in moist potting mix. Since my space under the lights is limited, I don't like to have any empty spots, so I germinate seeds before planting.
 To pre-sprout daylily seeds, soak them in water with a little added hydrogen peroxide (1 tablespoon of 3% hydrogen peroxide per quart of water). You can soak seeds in a glass, or you can soak them right in their little labeled zip-top plastic seed bag, leaving a little air space in the bag. When you see a little "tail" of root forming, the seed has germinated and is ready to plant.
I like to use deep 36 cell "sheet pots" that are about the size of 2 inch pots. Each cell gets planted with 1 to 5 sprouted seeds of a given cross. I've also planted 1 seed per cell in a 48 cell flat. Some people have good results using 16 oz plastic cups with holes poked in the bottom for drainage, planting as many as 20 seeds per cup.
Fill your chosen pots with slightly moist, good quality soil-less potting mix. Plant your sprouted seeds 1/8 to 1/4 inch below the surface of the potting mix. Water in with a little weak chamomile tea or peroxide water. Bottom water thereafter, to help prevent damping-off and other problems. Place them under lights, as close to the bulb as possible.
 The first time I grew out seeds, I didn't think I'd manage to keep track of specific crosses all the way from soaking and germinating seeds to transplanting into pots and then into the garden. And frankly, I didn't think I'd get any new plants worth getting worked up about. So I threw all the seeds together into one big jar. Two years later, when they started blooming, I was amazed at how beautiful some of them were!
Although parentage isn't strictly necessary information for registering a daylily, most breeders and growers prefer to know the parentage of named varieties. I didn't end up with any I really thought were worthy of registration, but I do wish I knew the parentage of a couple of my nicer ones.
 Last year, I started some more daylilies from seed. Some of my seeds again came from trades, and I also purchased a few from a DGer selling on the Lily Auction site. I am looking forward to being able to purchase seeds for next year from Dave's new auction site!
I made use of the lessons learned from my first seedlings. This time, I did keep track of the crosses, so I know the parentage of these seedlings. I used an Industrial Sharpie marker to write on a plastic tag that's in the pot and will later be buried with the plant. I also used a metallic silver Sharpie to write directly on my black nursery pots. When the daylilies get planted out in my garden, I'll add a metal marker with an Avery clear laser label.
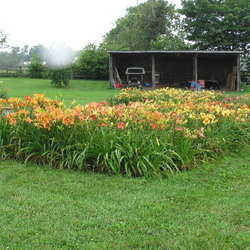
When those first little seedlings were planted directly out into the garden three years ago, they didn't look all that different from a tuft of grass. Some of them almost got themselves pulled up as weeds! This time, I wasn't taking any chances. After hardening off the seedlings last spring, I potted up the seedlings into trade gallon pots on my patio. They overwintered just fine in a sheltered location near the house and will be planted out this year.
 I'm not sure my garden could have too many daylilies. Growing them from seed means I am limited only by my own impatience as I wait for those first blooms, not by my budget. For blooms like these, I'm willing to wait!
For more information on growing daylilies, drop by DG's Daylilies Forum or visit the American Hemerocallis Society website.
Interested in growing out some of your own daylily crosses? For a wonderful article on the basics of hybridizing daylilies, see Michele Meyer's DG article, "Hybridizing Daylilies–Child's Play."
Photos by Jill M. Nicolaus.